About the Image and File Viewer Available Shortcuts•Unlock record for editing- (Control) + (Spacebar)•Create New record-(Control) + (F1)•Navigate through Images- Next (Control) + (Arrow Right) or (Control) + (Arrow Down) Previous(Control) + (Arrow Left) or (Control) + (Arrow Up)IntroductionThe Image and File Viewer can be accessed from a number of different screens including:•Deployment Records•Training Records•Certification Records•Daily Log Records•Medical Records•Expense Records•Master Name Records•User, Supervisor and K-9 ProfilesAcceptable File TypesThere are several different file types that are accepted by KANINE Version 5.0 as attachments. Acceptable file types include the following:•.png•.jpg•.gif•.bmp•.tif•.pdf (Must have Free Adobe Reader Installed)•.doc (Must have Microsoft Word or alternative Installed)Attaching Images and FilesThere are two ways of adding images and files into the KANINE 5.0 system. •Adding images and files by clicking the ‘Files’ button on most data entry record screens•Adding images and files from the main KANINE screen that are in the system, but not actually attached to a record.Attaching Files from within a recordTo attach a file to a record, such as a Deployment or Training record, you must navigate to the desired record itself and then click the ‘Files’ button to enter the Image and File Viewer Screen. Entering the Viewer screen in this method carries a reference to the record so that the viewer knows which record to attach the designated files to.On entering the Viewer Screen, click the ‘New’ button to attach a file to the record that you entered the viewer from. For instance, if you create a Deployment report for a narcotics find that your K-9 located, you would enter the Deployment record information and then, while centered on that record in the Deployment screen, click the ‘Files’ button to enter the ‘Image and File Viewer’ screen.KANINE already knows which record you are attaching the file to, so all you have to do is locate the file, select it for attachment and then add or edit the information for the file as required.When you click the ‘New’ button on the Viewer screen, a file browser window will open, allowing you to select the image that you want to attach from any accessible location on your computer or network. By default, the browser window looks to the designated KANINE ‘Pictures’ folder in ‘C:\CBD Data’. You can, of course, use the File Browser window (Shown at the right) to locate files in any other accessible directory.Connecting files to the KANINE system does the following:•Creates an entry in the database with information about the attached file including the date attached, physical location of the file, record type and ID # of the record that the file is connected to, etc.•Creates a copy of the file and moves it into the designated KANINE Pictures folder. The ‘Pictures’ folder will be automatically created in the KANINE 5.0 data folder. Normally this is located at ‘C:\CBD Data’.Viewing attached filesOnce a file has been attached to a record, you can view the file at any time by navigating to the record itself (Deployment, Training, etc) and then clicking the ‘Files’ button. The ‘Files’ button should indicate a count of the number of files that are attached to any selected record. When the viewer opens, you should see the first image in the viewer screen as well as a reference to all attached files in the files list at the left hand bottom portion of the viewer screen. Viewing Attached Pdf and Word (Doc) filesPdf files and Microsoft Word documents interact with the Viewer differently than image type files. To view Pdf files in the image viewer, the computer must have Adober Reader installed. When viewing a Pdf file, the file is actually opened within the Viewer window, but inside of the Acrobat Reader.Microsoft Word documents cannot be Viewed inside the Viewer window. To view a Microsoft Word document that has been added, you must click the ‘Default Viewer’ button. This will cause the document to be opened inside of Microsoft Word, which also must be installed on the computer to view Word documents. Navigating through files in the viewerTo move from one file to another within the viewer, you can either select a different file from the file selection list on the lower left side of the screen or, alternatively, you can click one of the navigation buttons situated on either side of the file image screen (Shown at the right). Click the button to the left of the image to move to the previous image or file. Click the button to the right of the image to move to the next image. If you enter the viewer from the main screen, you will see all available images and files that have been attached to the any record. Alternatively, if you enter the viewer from a record itself (Not from the main KANINE screen), by default, you will only see images and files that have been attached to that record.Viewing additional records in the viewerIf you want to view certain records that have been attached to the system, you can use the ‘Show’ button in the viewer to locate a different set of images and files. For example, clicking ‘Show/Show All’ will display all available images and files no matter which records they have been attached to.Changing the ‘Filename’ of an attached fileTo change the name of a file that has been added to the system using the viewer, you must click the spyglass image at the right side of the ‘File Name’ field. An information box will be displayed, requesting a new name for the file. Simply type a new name for the file and hit the enter key. The file name will be changed at both the file level and the record level. This allows the user to give the file a name that better describes the file.Deleting a fileClicking the ‘Delete’ button deletes the record that contains the file or image information immediately. The actual file itself, is immediately marked for deletion, but is not actually deleted until the KANINE software is shutdown next.Printing ImagesThere are two ways to print images attached to KANINE. The user can either click the ‘Default Viewer’ button to open the photo in the default application used to open images, which normally has built in print functionality. Or, you can click the ‘Print’ button, which opens all listed images in the report viewer window. If there is more than one reports listed, and you only want to print a single page, you can simply click the printer button in the viewer and then type only the page number of the photo that you want to print into the pages field.Printing the image from the Report viewer window prints a KANINE specific report that includes important information from the image record directly on the printed report.Full Screen ModeThe KANINE 5.0 Image and File Viewer now has an option for Full Screen mode as well. Full screen mode can be activated by clicking the ‘View in Full Screen Mode’ button. This mode offers the greatest amount of viewing area and can be used while the report viewer window is open or closed.


 About the Image and File Viewer
 Available Shortcuts
•
Unlock record for editing- (Control) + (Spacebar)
•
Create New record- (Control) + (F1)
•
Navigate through Images- Next (Control) + (Arrow Right) or (Control) + (Arrow Down)
Previous(Control) + (Arrow Left) or (Control) + (Arrow Up)
Available Shortcuts
•
Unlock record for editing- (Control) + (Spacebar)
•
Create New record- (Control) + (F1)
•
Navigate through Images- Next (Control) + (Arrow Right) or (Control) + (Arrow Down)
Previous(Control) + (Arrow Left) or (Control) + (Arrow Up)


 Introduction
The Image and File Viewer can be accessed from a number of different screens including:
•
Deployment Records
•
Training Records
•
Certification Records
•
Daily Log Records
•
Medical Records
•
Expense Records
•
Master Name Records
•
User, Supervisor and K-9 Profiles
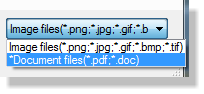
Acceptable File Types
There are several different file types that are accepted by KANINE Version 5.0 as attachments.
Acceptable file types include the following:
•
.png
•
.jpg
•
.gif
•
.bmp
•
.tif
•
.pdf (Must have Free Adobe Reader Installed)
•
.doc (Must have Microsoft Word or alternative Installed)
Attaching Images and Files
There are two ways of adding images and files into the KANINE 5.0 system.
•
Adding images and files by clicking the ‘Files’ button on most data entry record screens
•
Adding images and files from the main KANINE screen that are in the system, but not actually
attached to a record.
Attaching Files from within a record
To attach a file to a record, such as a Deployment or Training record, you
must navigate to the desired record itself and then click the ‘Files’ button to
enter the Image and File Viewer Screen. Entering the Viewer screen in this
method carries a reference to the record so that the viewer knows which
record to attach the designated files to.
On entering the Viewer Screen, click the ‘New’ button to attach a file to the record that you entered the
viewer from. For instance, if you create a Deployment report for a narcotics find that your K-9
located, you would enter the Deployment record information and then, while centered on that
record in the Deployment screen, click the ‘Files’
button to enter the ‘Image and File Viewer’ screen.
KANINE already knows which record you are attaching
the file to, so all you have to do is locate the file, select
it for attachment and then add or edit the information for
the file as required.
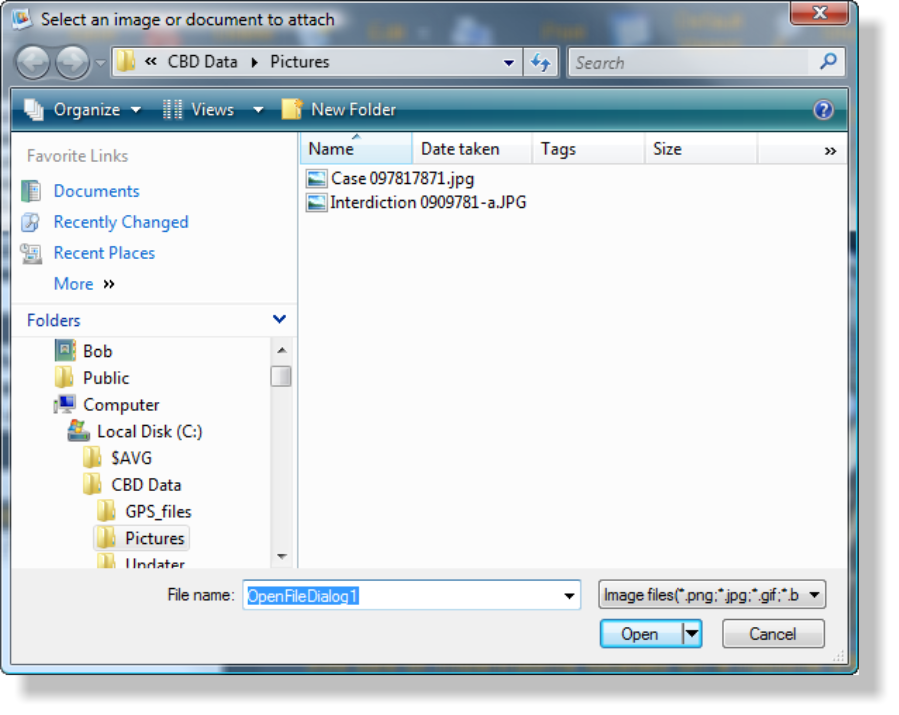
When you click the ‘New’ button on the Viewer screen,
a file browser window will open, allowing you to select
the image that you want to attach from any accessible
location on your computer or network. By default, the
browser window looks to the designated KANINE
‘Pictures’ folder in ‘C:\CBD Data’. You can, of course,
use the File Browser window (Shown at the right) to
locate files in any other accessible directory.
Connecting files to the KANINE system does the following:
•
Creates an entry in the database with information about the
attached file including the date attached, physical location of the
file, record type and ID # of the record that the file is connected to,
etc.
•
Creates a copy of the file and moves it into the designated KANINE Pictures folder. The ‘Pictures’
folder will be automatically created in the KANINE 5.0 data folder. Normally this is located at
‘C:\CBD Data’.
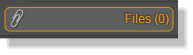
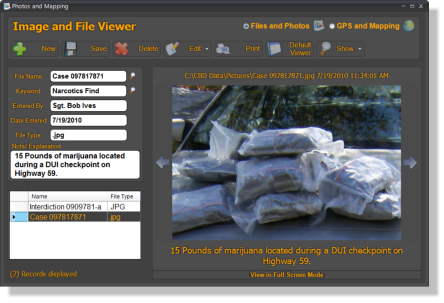
Viewing attached files
Once a file has been attached to a record, you can view the file at any time by navigating to the record
itself (Deployment, Training, etc) and then clicking the ‘Files’ button. The ‘Files’ button should indicate a
count of the number of files that are attached to any selected record. When the viewer opens, you
should see the first image in the viewer screen as well as a reference to all attached files in the files list
at the left hand bottom portion of the viewer screen.
Viewing Attached Pdf and Word (Doc) files
Pdf files and Microsoft Word documents interact with the Viewer differently than image type files. To view
Pdf files in the image viewer, the computer must have Adober Reader installed. When viewing a Pdf file,
the file is actually opened within the Viewer window, but inside of the Acrobat Reader.
Microsoft Word documents cannot be Viewed inside the Viewer window. To view a Microsoft Word
document that has been added, you must click the ‘Default Viewer’ button. This will cause the document
to be opened inside of Microsoft Word, which also must be installed on the computer to view Word
documents.
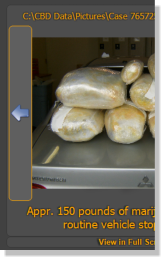
Navigating through files in the viewer
To move from one file to another within the viewer, you can either select a
different file from the file selection list on the lower left side of the screen or,
alternatively, you can click one of the navigation buttons situated on either
side of the file image screen (Shown at the right). Click the button to the left
of the image to move to the previous image or file. Click the button to the right
of the image to move to the next image. If you enter the viewer from the main
screen, you will see all available images and files that have been attached to
the any record. Alternatively, if you enter the viewer from a record itself (Not
from the main KANINE screen), by default, you will only see images and files
that have been attached to that record.
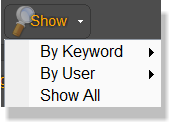
Viewing additional records in the viewer
If you want to view certain records that have been attached to the system, you
can use the ‘Show’ button in the viewer to locate a different set of images and
files. For example, clicking ‘Show/Show All’ will display all available images
and files no matter which records they have been attached to.
Changing the ‘Filename’ of an attached file
To change the name of a file that has been added to the system using the viewer, you must click the
spyglass image at the right side of the ‘File Name’ field. An information box will be displayed, requesting
a new name for the file. Simply type a new name for the file and hit the enter key. The file name will be
changed at both the file level and the record level. This allows the user to give the file a name that better
describes the file.
Deleting a file
Clicking the ‘Delete’ button deletes the record that contains the file or image information immediately.
The actual file itself, is immediately marked for deletion, but is not actually deleted until the KANINE
software is shutdown next.
Printing Images
There are two ways to print images attached to
KANINE. The user can either click the ‘Default Viewer’
button to open the photo in the default application
used to open images, which normally has built in print
functionality. Or, you can click the ‘Print’ button, which
opens all listed images in the report viewer window. If
there is more than one reports listed, and you only
want to print a single page, you can simply click the
printer button in the viewer and then type only the
page number of the photo that you want to print into
the pages field.
Printing the image from the Report viewer window
prints a KANINE specific report that includes important
information from the image record directly on the printed
report.
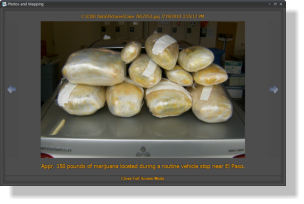
Full Screen Mode
The KANINE 5.0 Image and File Viewer now has an option
for Full Screen mode as well. Full screen mode can be
activated by clicking the ‘View in Full Screen Mode’ button.
This mode offers the greatest amount of viewing area and
can be used while the report viewer window is open or
closed.
Introduction
The Image and File Viewer can be accessed from a number of different screens including:
•
Deployment Records
•
Training Records
•
Certification Records
•
Daily Log Records
•
Medical Records
•
Expense Records
•
Master Name Records
•
User, Supervisor and K-9 Profiles
Acceptable File Types
There are several different file types that are accepted by KANINE Version 5.0 as attachments.
Acceptable file types include the following:
•
.png
•
.jpg
•
.gif
•
.bmp
•
.tif
•
.pdf (Must have Free Adobe Reader Installed)
•
.doc (Must have Microsoft Word or alternative Installed)
Attaching Images and Files
There are two ways of adding images and files into the KANINE 5.0 system.
•
Adding images and files by clicking the ‘Files’ button on most data entry record screens
•
Adding images and files from the main KANINE screen that are in the system, but not actually
attached to a record.
Attaching Files from within a record
To attach a file to a record, such as a Deployment or Training record, you
must navigate to the desired record itself and then click the ‘Files’ button to
enter the Image and File Viewer Screen. Entering the Viewer screen in this
method carries a reference to the record so that the viewer knows which
record to attach the designated files to.
On entering the Viewer Screen, click the ‘New’ button to attach a file to the record that you entered the
viewer from. For instance, if you create a Deployment report for a narcotics find that your K-9
located, you would enter the Deployment record information and then, while centered on that
record in the Deployment screen, click the ‘Files’
button to enter the ‘Image and File Viewer’ screen.
KANINE already knows which record you are attaching
the file to, so all you have to do is locate the file, select
it for attachment and then add or edit the information for
the file as required.
When you click the ‘New’ button on the Viewer screen,
a file browser window will open, allowing you to select
the image that you want to attach from any accessible
location on your computer or network. By default, the
browser window looks to the designated KANINE
‘Pictures’ folder in ‘C:\CBD Data’. You can, of course,
use the File Browser window (Shown at the right) to
locate files in any other accessible directory.
Connecting files to the KANINE system does the following:
•
Creates an entry in the database with information about the
attached file including the date attached, physical location of the
file, record type and ID # of the record that the file is connected to,
etc.
•
Creates a copy of the file and moves it into the designated KANINE Pictures folder. The ‘Pictures’
folder will be automatically created in the KANINE 5.0 data folder. Normally this is located at
‘C:\CBD Data’.
Viewing attached files
Once a file has been attached to a record, you can view the file at any time by navigating to the record
itself (Deployment, Training, etc) and then clicking the ‘Files’ button. The ‘Files’ button should indicate a
count of the number of files that are attached to any selected record. When the viewer opens, you
should see the first image in the viewer screen as well as a reference to all attached files in the files list
at the left hand bottom portion of the viewer screen.
Viewing Attached Pdf and Word (Doc) files
Pdf files and Microsoft Word documents interact with the Viewer differently than image type files. To view
Pdf files in the image viewer, the computer must have Adober Reader installed. When viewing a Pdf file,
the file is actually opened within the Viewer window, but inside of the Acrobat Reader.
Microsoft Word documents cannot be Viewed inside the Viewer window. To view a Microsoft Word
document that has been added, you must click the ‘Default Viewer’ button. This will cause the document
to be opened inside of Microsoft Word, which also must be installed on the computer to view Word
documents.
Navigating through files in the viewer
To move from one file to another within the viewer, you can either select a
different file from the file selection list on the lower left side of the screen or,
alternatively, you can click one of the navigation buttons situated on either
side of the file image screen (Shown at the right). Click the button to the left
of the image to move to the previous image or file. Click the button to the right
of the image to move to the next image. If you enter the viewer from the main
screen, you will see all available images and files that have been attached to
the any record. Alternatively, if you enter the viewer from a record itself (Not
from the main KANINE screen), by default, you will only see images and files
that have been attached to that record.
Viewing additional records in the viewer
If you want to view certain records that have been attached to the system, you
can use the ‘Show’ button in the viewer to locate a different set of images and
files. For example, clicking ‘Show/Show All’ will display all available images
and files no matter which records they have been attached to.
Changing the ‘Filename’ of an attached file
To change the name of a file that has been added to the system using the viewer, you must click the
spyglass image at the right side of the ‘File Name’ field. An information box will be displayed, requesting
a new name for the file. Simply type a new name for the file and hit the enter key. The file name will be
changed at both the file level and the record level. This allows the user to give the file a name that better
describes the file.
Deleting a file
Clicking the ‘Delete’ button deletes the record that contains the file or image information immediately.
The actual file itself, is immediately marked for deletion, but is not actually deleted until the KANINE
software is shutdown next.
Printing Images
There are two ways to print images attached to
KANINE. The user can either click the ‘Default Viewer’
button to open the photo in the default application
used to open images, which normally has built in print
functionality. Or, you can click the ‘Print’ button, which
opens all listed images in the report viewer window. If
there is more than one reports listed, and you only
want to print a single page, you can simply click the
printer button in the viewer and then type only the
page number of the photo that you want to print into
the pages field.
Printing the image from the Report viewer window
prints a KANINE specific report that includes important
information from the image record directly on the printed
report.
Full Screen Mode
The KANINE 5.0 Image and File Viewer now has an option
for Full Screen mode as well. Full screen mode can be
activated by clicking the ‘View in Full Screen Mode’ button.
This mode offers the greatest amount of viewing area and
can be used while the report viewer window is open or
closed.