Export Manager OverviewOnce you have set the ‘Export path’ in the exporting database, the export process is as simple as A)making sure that you have a connection to the shared database folder and B) clicking the ‘Begin Transfer Now’ button. That’s it.Checking for connectivityKANINE must know where the shared‘K95.mdb’database is located. Because this database could be located in any number of places, you must manually set the path to the correct location.Green lights at the top of the Export Manager indicate connectivity, red lights indicate that there is not a connection.To do this, you must click the ‘Set Export Database Path’ link, which can be found on the ‘Settings’ tab of the Export manager. On clicking this link, you will be taken into the ‘Settings’ where you will see the Export path field, which contains a button to allow you to browse to the correct K95.mdb file on your agencies server (Note: You can also paste or typethe full path as well). Important Note: This path setting is stored in the exporting database itself and must be set for any disconnected user that will be exporting records via the Export Manager. Once set, the path should not need to be set again unless the location of the shared database folder is changed.Very Important: Before running the Export process for the first time, click the ‘Set export database paths’ setting’ link and verify that the path is set to K95.mdb database on the server, and NOT a KANINE2006.mdb.I keep my KANINE records on a USB drive and do not have connectivity to the network on my laptop, how do I perform an export?If you normally plug in your USB drive to access your KANINE records, this is what you would do to perform an export. (Note that the shared database must exist and you must have the export path, as shown above, set in your database)A) Plug your USB drive into USB drive into an office based computer that has network connectivityB) Run the KANINE 5.0 softwareC) Click the ‘Export’ button on the main KANINE screenD) After ensuring a proper connection to the shared K95.mdb database (Green lights), click the ‘Begin Transfer Now’ button.E) Once the transfer process has completed, you can close the transfer screen, exit the KANINE software, and remove your USB drive from the computer. I don’t normally keep my KANINE records on a USB drive, how can I transfer my records?Even if you do not normally use a USB drive to access your KANINE records, you can use the ‘USB Export File Creator’(Main KANINE Screen/File/USB Export File Creator) to create a temporary, exportable copy of your data to a USB drive. Once the file has been created on your USB drive, you can transport the USB drive to a computer in the office, plug the USB drive in, run KANINE and allow the system to export the data from the USB drive to the server database. When the export is complete, KANINE 5.0 will close, and the exportable folder will be deleted from the USB drive automaticallyHere are the steps to using the USB Export File Creator to export your recordsNOTE: This feature is available in version 5.0.26 to be available on 09-20-10On the Laptop•Enter one or more records in the KANINE 5.0 software on your laptop•Plug in a USB drive•On the main screen of KANINE 5.0, click on ‘File/USB Export File Creator’•Ensure that the correct removable drive is selected (Screen above) and click the ‘Create export file now!’ button. the system will create the exportable file on the USB drive and this screen will close.•Close KANINE 5.0•Unplug the USB drive from the laptop.On the office computer•Plug the USB drive that contains the exportable data file into a computer that has KANINE 5.0 installed.•Run the KANINE 5.0 software.•The system should automatically detect the exportable file and ask if you want to export the file now. Click ‘Yes’.A modified Log In screen will appear (as shown below)•Simply login and the export process will be automatically completed. NOTE: If the ‘Export Path’ has not been set on the laptop, the export will not automatically complete and you will have to set the Export Path each time. To avoid this, set the export path on the laptop to point to the server based K95.mdb file prior to running the USB Export File Creator.•Once complete, KANINE will close automatically and the Exportable file will be automatically deleted.•Finished! Unplug the USB drive until the next time you are ready to export records and the repeat the above process in it’s entirety.Which records will be exported during the transfer process?For a record to be exported, the check box for that record type must be checked, by default the check box for ‘Photos/Files’ is not checked since file sizes can possibly make this a more time consuming process. the export process will then transfer any record whose ‘Exported’ check box is not checked. As records are transferred, their ‘Exported’ check box is automatically checked to indicate that the record has been exported. Records that have been exported do not need to be unchecked for re-export unless the user has made changes to the record and would like to send those changes to the server database.NOTE: The very first time a record export is performed it must export ALL records, so that it can mark them as ‘Exported’. This process can be lengthy if your database contains a large number of records. Subsequent transfers will be much faster, as the process will only transfer any newly added records. I received an error during the export process, what should I do?If you receive an error, it’s likely an indication of one of a few things:1.Your export path may not set to the correct server based K95.mdb file. Check to make sure that the path is set correctly.2.A record error exists in the database. You can look at the log and see which record type caused the error to occur, then go to the tab for that record type. Likely, the problem record will be the first unchecked record. To resolve this do the following:1.Close the Export Manager. Navigate to the Main KANINE screen and click File/Perform database Cleanup. The cleanup process may clear up any inconsistencies in the database that caused a problem.2.If the database cleanup does not resolve the issue, you may need to delete the offending record and re-enter it into the system. This is a worst case scenario and, in most cases, should never occur.


 Export Manager Overview
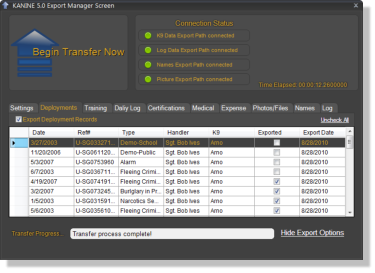
Once you have set the ‘Export path’ in the exporting database, the export process is as simple as A)
making sure that you have a connection to the
shared database folder and B) clicking the ‘Begin
Transfer Now’ button. That’s it.
Checking for connectivity
KANINE must know where the shared ‘K95.mdb’
database is located. Because this database could
be located in any number of places, you must
manually set the path to the correct location.
Green lights at the top of the Export Manager
indicate connectivity, red lights indicate that
there is not a connection.
To do this, you must click the ‘Set Export
Database Path’ link,
which can be found
on the ‘Settings’ tab
of the Export
manager. On clicking
this link, you will be
taken into the
‘Settings’ where you
will see the Export
path field, which
contains a button to
allow you to browse to the correct K95.mdb file on your agencies server (Note: You can also paste or type
the full path as well).
Important Note: This path setting is stored in the exporting database itself and must be set for any
disconnected user that will be exporting records via the Export Manager. Once set, the path should not
need to be set again unless the location of the shared database folder is changed.
Very Important: Before running the Export process for the first time, click the ‘Set export database paths’
setting’ link and verify that the path is set to K95.mdb database on the server, and NOT a
KANINE2006.mdb.
I keep my KANINE records on a USB drive and do not have connectivity to the network
on my laptop, how do I perform an export?
If you normally plug in your USB drive to access your KANINE records, this is what you would do to
perform an export. (Note that the shared database must exist and you must have the export path, as shown
above, set in your database)
A) Plug your USB drive into USB drive into an office based computer that has network connectivity
B) Run the KANINE 5.0 software
C) Click the ‘Export’ button on the main KANINE screen
D) After ensuring a proper connection to the shared K95.mdb database (Green lights), click the ‘Begin
Transfer Now’ button.
E) Once the transfer process has completed, you can close the transfer screen, exit the KANINE software,
and remove your USB drive from the computer.
I don’t normally keep my KANINE records on
a USB drive, how can I transfer my records?
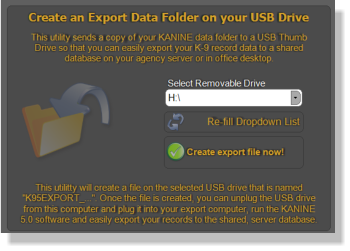
Even if you do not normally use a USB drive to access
your KANINE records, you can use the ‘USB Export
File Creator’ (Main KANINE Screen/File/USB Export
File Creator) to create a temporary, exportable copy of
your data to a USB drive. Once the file has been
created on your USB drive, you can transport the USB
drive to a computer in the office, plug the USB drive in,
run KANINE and allow the system to export the data
from the USB drive to the server database. When the
export is complete, KANINE 5.0 will close, and the
exportable folder will be deleted from the USB drive
automatically
Here are the steps to using the USB Export File Creator to export your records
NOTE: This feature is available in version 5.0.26 to be available on 09-20-10
On the Laptop
•
Enter one or more records in the KANINE 5.0 software on your laptop
•
Plug in a USB drive
•
On the main screen of KANINE 5.0, click on ‘File/USB Export File Creator’
•
Ensure that the correct removable drive is selected (Screen above) and click the ‘Create export file
now!’ button. the system will create the exportable file on the USB drive and this screen will close.
•
Close KANINE 5.0
•
Unplug the USB drive from the laptop.
On the office computer
•
Plug the USB drive that contains the
exportable data file into a computer that has
KANINE 5.0 installed.
•
Run the KANINE 5.0 software.
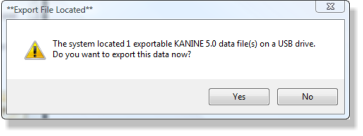
•
The system should automatically detect the
exportable file and ask if you want to export
the file now. Click ‘Yes’.
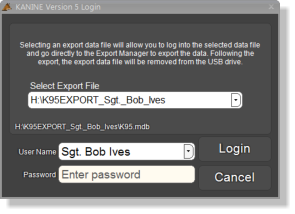
A modified Log In screen will appear (as shown below)
•
Simply login and the export process will be
automatically completed. NOTE: If the ‘Export Path’
has not been set on the laptop, the export will not
automatically complete and you will have to set the
Export Path each time. To avoid this, set the export
path on the laptop to point to the server based
K95.mdb file prior to running the USB Export File
Creator.
•
Once complete, KANINE will close automatically and
the Exportable file will be automatically deleted.
•
Finished! Unplug the USB drive until the next time
you are ready to export records and the repeat the
above process in it’s entirety.
Which records will be exported during the transfer process?
For a record to be exported, the check box for that record type must be checked, by default the check box
for ‘Photos/Files’ is not checked since file sizes can possibly make this a more time consuming process.
the export process will then transfer any record whose ‘Exported’ check box is not checked. As records are
transferred, their ‘Exported’ check box is automatically checked to indicate that the record has been
exported. Records that have been exported do not need to be unchecked for re-export unless the user has
made changes to the record and would like to send those changes to the server database.
NOTE: The very first time a record export is performed it must export ALL records, so that it can
mark them as ‘Exported’. This process can be lengthy if your database contains a large number
of records. Subsequent transfers will be much faster, as the process will only transfer any
newly added records.
I received an error during the export process, what should I do?
If you receive an error, it’s likely an indication of one of a few things:
1.
Your export path may not set to the correct server based K95.mdb file. Check to make sure
that the path is set correctly.
2.
A record error exists in the database. You can look at the log and see which record type caused
the error to occur, then go to the tab for that record type. Likely, the problem record will be the first
unchecked record. To resolve this do the following:
1.
Close the Export Manager. Navigate to the Main KANINE screen and click File/Perform
database Cleanup. The cleanup process may clear up any inconsistencies in the database that
caused a problem.
2.
If the database cleanup does not resolve the issue, you may need to delete the offending
record and re-enter it into the system. This is a worst case scenario and, in most cases, should
never occur.
Export Manager Overview
Once you have set the ‘Export path’ in the exporting database, the export process is as simple as A)
making sure that you have a connection to the
shared database folder and B) clicking the ‘Begin
Transfer Now’ button. That’s it.
Checking for connectivity
KANINE must know where the shared ‘K95.mdb’
database is located. Because this database could
be located in any number of places, you must
manually set the path to the correct location.
Green lights at the top of the Export Manager
indicate connectivity, red lights indicate that
there is not a connection.
To do this, you must click the ‘Set Export
Database Path’ link,
which can be found
on the ‘Settings’ tab
of the Export
manager. On clicking
this link, you will be
taken into the
‘Settings’ where you
will see the Export
path field, which
contains a button to
allow you to browse to the correct K95.mdb file on your agencies server (Note: You can also paste or type
the full path as well).
Important Note: This path setting is stored in the exporting database itself and must be set for any
disconnected user that will be exporting records via the Export Manager. Once set, the path should not
need to be set again unless the location of the shared database folder is changed.
Very Important: Before running the Export process for the first time, click the ‘Set export database paths’
setting’ link and verify that the path is set to K95.mdb database on the server, and NOT a
KANINE2006.mdb.
I keep my KANINE records on a USB drive and do not have connectivity to the network
on my laptop, how do I perform an export?
If you normally plug in your USB drive to access your KANINE records, this is what you would do to
perform an export. (Note that the shared database must exist and you must have the export path, as shown
above, set in your database)
A) Plug your USB drive into USB drive into an office based computer that has network connectivity
B) Run the KANINE 5.0 software
C) Click the ‘Export’ button on the main KANINE screen
D) After ensuring a proper connection to the shared K95.mdb database (Green lights), click the ‘Begin
Transfer Now’ button.
E) Once the transfer process has completed, you can close the transfer screen, exit the KANINE software,
and remove your USB drive from the computer.
I don’t normally keep my KANINE records on
a USB drive, how can I transfer my records?
Even if you do not normally use a USB drive to access
your KANINE records, you can use the ‘USB Export
File Creator’ (Main KANINE Screen/File/USB Export
File Creator) to create a temporary, exportable copy of
your data to a USB drive. Once the file has been
created on your USB drive, you can transport the USB
drive to a computer in the office, plug the USB drive in,
run KANINE and allow the system to export the data
from the USB drive to the server database. When the
export is complete, KANINE 5.0 will close, and the
exportable folder will be deleted from the USB drive
automatically
Here are the steps to using the USB Export File Creator to export your records
NOTE: This feature is available in version 5.0.26 to be available on 09-20-10
On the Laptop
•
Enter one or more records in the KANINE 5.0 software on your laptop
•
Plug in a USB drive
•
On the main screen of KANINE 5.0, click on ‘File/USB Export File Creator’
•
Ensure that the correct removable drive is selected (Screen above) and click the ‘Create export file
now!’ button. the system will create the exportable file on the USB drive and this screen will close.
•
Close KANINE 5.0
•
Unplug the USB drive from the laptop.
On the office computer
•
Plug the USB drive that contains the
exportable data file into a computer that has
KANINE 5.0 installed.
•
Run the KANINE 5.0 software.
•
The system should automatically detect the
exportable file and ask if you want to export
the file now. Click ‘Yes’.
A modified Log In screen will appear (as shown below)
•
Simply login and the export process will be
automatically completed. NOTE: If the ‘Export Path’
has not been set on the laptop, the export will not
automatically complete and you will have to set the
Export Path each time. To avoid this, set the export
path on the laptop to point to the server based
K95.mdb file prior to running the USB Export File
Creator.
•
Once complete, KANINE will close automatically and
the Exportable file will be automatically deleted.
•
Finished! Unplug the USB drive until the next time
you are ready to export records and the repeat the
above process in it’s entirety.
Which records will be exported during the transfer process?
For a record to be exported, the check box for that record type must be checked, by default the check box
for ‘Photos/Files’ is not checked since file sizes can possibly make this a more time consuming process.
the export process will then transfer any record whose ‘Exported’ check box is not checked. As records are
transferred, their ‘Exported’ check box is automatically checked to indicate that the record has been
exported. Records that have been exported do not need to be unchecked for re-export unless the user has
made changes to the record and would like to send those changes to the server database.
NOTE: The very first time a record export is performed it must export ALL records, so that it can
mark them as ‘Exported’. This process can be lengthy if your database contains a large number
of records. Subsequent transfers will be much faster, as the process will only transfer any
newly added records.
I received an error during the export process, what should I do?
If you receive an error, it’s likely an indication of one of a few things:
1.
Your export path may not set to the correct server based K95.mdb file. Check to make sure
that the path is set correctly.
2.
A record error exists in the database. You can look at the log and see which record type caused
the error to occur, then go to the tab for that record type. Likely, the problem record will be the first
unchecked record. To resolve this do the following:
1.
Close the Export Manager. Navigate to the Main KANINE screen and click File/Perform
database Cleanup. The cleanup process may clear up any inconsistencies in the database that
caused a problem.
2.
If the database cleanup does not resolve the issue, you may need to delete the offending
record and re-enter it into the system. This is a worst case scenario and, in most cases, should
never occur.