About the GPS Manager screenThe KANINE 5.0 GPS Manager screen provides the built in functionality necessary to perform all actions required to download and manage GPS Track data that has been collected by the GPS TrackPack.The GPS Manager screen also allows the internet connected user to perform Google Maps searches and to query the GPS TrackPack for the user’s current location.By having this functionality built directly into the software, the user can quickly collect track data, download and convert the track data into a GPS map. Downloaded maps can then be converted into an image file so that they can be connected directly to a Deployment or Training report as needed.GPS Functionality and RequirementsKANINE Software includes a variety of built-in functions that interact with the KANINE GPS TrackPack datalogger device. To utilize the full functionality of this screen, the computer must meet certain requirements. Installation of the GPS device will be covered in a seperate section.Computer Requirements•Gps TrackPack Device driver- A driver for the GPS device must be installed on the computer. This driver is included in the CD that is sent with the GPS Unit.•Java Runtime- The Java runtime must be installed to any computer that needs to interact with the GPS unit, such as downloading maps. Java can be downloaded here: http://www.java.com/en/download/ •Internet Connection- The GPS screen does not necessarily require an internet connection to actually download a GPS map from the TrackPack Unit. However, to actually render or view the map, an internet connection must be available.Connecting to the GPS UnitOnce the windows drivers and Java runtime are installed on the user’s computer, connecting to the GPS Unit couldn’t be simpler. Simply connect, turn the unit on, and go to the GPS Manager in the KANINE software.Connection methods•USB Cord- The simplest and fastest method of connecting to the GPS Unit is to use the provided USB cord. This type of connection provides the fastest means of data transfer from the unit and also charges the unit’s battery as well.•Blue Tooth Connection- A connection to the GPS unit can also be made via Blueooth if the user’s computer has Bluetooth capability. This kind of connection works well, but has a slower rate of transferring data than does a USB connection.Connecting to the device within the softwareMany GPS related applications require the user to select the computer port that the GPS device is connected to. This is not the case in KANINE. Any time that the KANINE software needs to connect to the unit for an operation between the device and the computer, the KANINE software locates the unit (finds the port where the unit is attached) and connects automatically to the unit. There are no manual settings that need to be made by the user.Available FunctionalityThe following functionality is available to registered GPS TrackPack users. Note that each of these functions depend upon the GPS unit and software installation requirements discussed above.•Current Location- If the GPS Unit has a satellite connection and the user has an internet connection, clicking the ‘Current Location’ button will display a map showing the current location of the user.•Open Previously downloaded maps- The ‘Open Map’ button opens a file browser window that, by default, shows any previously downloaded files that are currently stored in the default GPS folder “...CBD Data\GPS_files”. Select any available file to view the previously downloaded map. If the map is a ‘Google Earth’ type of map file (KML, KMZ), then the map will be opened directly in Google Earth. Google Earth must be installed for this file type to open.•Download From GPS- This button currently allows the user to download map data collected on the GPS TrackPack unit to 4 different types of Map files. These file type, and their attributes, are listed below. Note that the user only needs to plug the unit in, turn the unit on to ‘Navigate’ and click the desired download menu item to activate the download process. The KANINE software will automatically connect to the device, download the map data from the GPS unit and then display the downloaded map in the GPS Manager window.oGoogle Maps (HTML)- Does not require any additional mapping software to be installed. Simply requires an Internet connection. Limited ability to alter the downloaded map.oGoogle Earth (KML)- Requires that Google Earth be installed on the computer. This format provides the most options for adjusting and altering the downloaded map.oGoogle Earth (KMZ)- Requires Google Earth be installed on the computer. Is a zipped version of the KML file. Smaller file, cannot alter the map like you can with a KML file.oGPX- GPX file types are used by some third party applications. There is no built in functionality, other than the ability to download to this type, in the KANINE software. You cannot currently view a GPX file in the KANINE software.•Clear GPS- The ‘Clear GPS’ button does just what it advertises. It clears all data from the GPS Unit. Before clearing the GPS unit, you should be sure that you have downloaded any desired map data from the unit. Once the unit is ‘Cleared’ the erased map data cannot be recovered. oRecommended data clearing tips- Although the GPS Unit can store multiple tracks at any one time, it is recommended that the user clear the unit before each new track (after downloading the map info), if possible. This keeps the unit uncluttered and makes downloading easier as you do not have to sort through multiple tracks. If the user must store multiple tracks on a unit, be sure to shut the unit off in between tracks and allow at least 2 minutes before each additional track. The software, when downloading maps from the unit, consider each seperation of two minutes or greater to be a seperate track and in turn will not attempt to tie the tracks together as one.•GPS Tools- The ‘GPS Tools’ button allows the user to perform secodary GPS functions, as described below.oSave map as .jpg/.png- Selecting one of these menu items turns whatever you are viewing in the GPS Manager screen into an image file, so that it can be attached to a desired Deployment or Training record. This function should be used after the user has either opened or downloaded a map into the GPS Manager screen. Additionally, the user should adjust the map for fit (side to size and zoom) prior to the screen capture. This function will capture the screen just as it is. When the image is created, it will be displayed to the user and will be saved to the default KANINE Pictures file ...\CBD Data\Pictures. A new feature in KANINE Version 5.0 is the ability to directly attach a GPS map image to a deployment or Training Record at the time of download. To perform this new process, do the following:▪Perform the Track, using the GPS TrackPack to log the track▪Create the training or deployment record in KANINE▪Click the ‘Files’ button. This will open the Image and File Viewer.▪Click the radio button at the top right of the Viewer screen to go to the ‘GPS and Mapping’ screen.▪Download the map from the GPS unit using your preferred download type.▪Adjust the map (zoom in, move left to right, etc. until the map is presented as you want to save it). ▪Click the ‘GPS Tools’ button▪Highlight the preferred ‘Save map as Menu item. (ie, Jpg or Png)▪Click ‘Attach to Current File’ menu item.The map will then be attached to the record that you originally created prior to entering the GPS screen.oSet recommended Logger Settings- Some GPS settings, whether computer based settings or GPS based settings can be adjusted from within the KANINE GPS Manager screen. To access the settings click the ‘GPS Tools’ button and then select the ‘Set Recommended Logger Settings’ menu item. The adjustment panel shown on the rightwill be displayed.In this panel, there are four four applicable settings that can be adjusted by the user, as listed below.▪Distance between track markers (meters)- This adjustment affects the logger unit during a track and tells the unit how often to mark the logger’s location during a track. The more often the location is marked, the larger the resulting map file. However, this should also result in a more accurate track. Imagine if you had the unit set to only mark the location every 20 meters. There would be a lot of twists and turns that the logger would have missed between marks. Therefore, the recommended settings is 1 meter for a K-9 Track.▪Output directory- To simplify the GPS processes, this setting is static and cannot be adjusted by the user. The GPS Output path is adjusted dynamically to send GPS map files to a folder named GPS_files that is created within the default data directory. So, if your data is stored in the default location at C:\CBD Data then the GPS files will be stored at C:\CBD Data\GPS_files.▪Time Adjustment- Because the GPS unit essentially gets a standard UTC based time from the satellite while the track is being recorded, it is necessary to provide a setting to tell the KANINE software how to adjust the time displayed on the maps so that they are accurate for the user’s time zone. For instance, the Time adjustment for the Central time zone would be -5. A map showing the necessary adjustment is shown to the right. This occurs at the time of data download, not at the time of the track.▪Adjust Track Color- This setting allows the user to adjust the track color to a custom setting. Then, when the track is downloaded from the unit, the process will mark the track in the selected color.oAdjust KML Track Left/Right- This is a special feature that most users will likely never have to use. We have found that in some areas, mainly rural, the converted map does not match up with the actual location of the GPS coordinates recorded by the data logger. In this case, the Adjustment Utility can be used to adjust the track so that it matches the map data and creates an accurate depiction of the mapped track.This adjustment can only be made to tracks that have been downloaded to Google Earth type files such as KML or KMZ.If you have a track that is visibly shifted left or right on the map, that needs adjustment, you should do the following to get an accurate map. Note that after the adjustment, Google Earth will automatically open and present the adjusted map.▪Download the map to Google Earth (KML) format.▪Open the Adjustment utility from the GPS Manager screen▪Click the ‘Select a file’ button to select the KML map file that needs adjusted▪By default, the amount of adjustment is set at ‘0.00015’. Click the ‘Perform adjustment now’ button to make the necessary adjustments. If the adjustments did not adequately compensate for the maps error, perform the process again, using as adjusted ‘Amount of adjust’oSearch- This function is not related to the GPS TrackPack unit, but instead provides a means for the user to perform a Google Maps search. Simply type an address or part of an address a map of the search area will be displayed in the GPS Manager screen.Full Screen Mode The ‘View in Full Screen Mode’ button is self explanatory and hides all but the main map scren so that the user has a full screen view of the map.


 About the GPS Manager screen
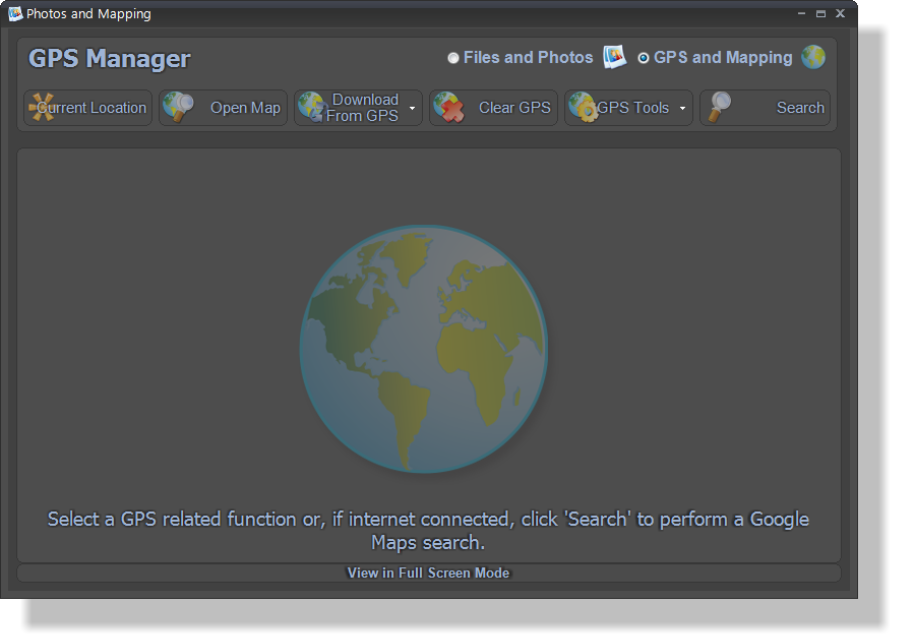
The KANINE 5.0 GPS Manager screen
provides the built in functionality necessary to
perform all actions required to download and
manage GPS Track data that has been
collected by the GPS TrackPack.
The GPS Manager screen also allows the
internet connected user to perform Google
Maps searches and to query the GPS
TrackPack for the user’s current location.
By having this functionality built directly into
the software, the user can quickly collect
track data, download and convert the track
data into a GPS map. Downloaded maps can
then be converted into an image file so that
they can be connected directly to a
Deployment or Training report as needed.
About the GPS Manager screen
The KANINE 5.0 GPS Manager screen
provides the built in functionality necessary to
perform all actions required to download and
manage GPS Track data that has been
collected by the GPS TrackPack.
The GPS Manager screen also allows the
internet connected user to perform Google
Maps searches and to query the GPS
TrackPack for the user’s current location.
By having this functionality built directly into
the software, the user can quickly collect
track data, download and convert the track
data into a GPS map. Downloaded maps can
then be converted into an image file so that
they can be connected directly to a
Deployment or Training report as needed.


 GPS Functionality and Requirements
KANINE Software includes a variety of built-in functions that interact with the KANINE GPS TrackPack
datalogger device. To utilize the full functionality of this screen, the computer must meet certain
requirements. Installation of the GPS device will be covered in a seperate section.
Computer Requirements
•
Gps TrackPack Device driver- A driver for the GPS device must be installed on the computer.
This driver is included in the CD that is sent with the GPS Unit.
•
Java Runtime- The Java runtime must be installed to any computer that needs to interact with the
GPS unit, such as downloading maps. Java can be downloaded here:
http://www.java.com/en/download/
•
Internet Connection- The GPS screen does not necessarily require an internet connection to
actually download a GPS map from the TrackPack Unit. However, to actually render or view the
map, an internet connection must be available.
Connecting to the GPS Unit
Once the windows drivers and Java runtime are installed on the user’s computer, connecting to the GPS
Unit couldn’t be simpler. Simply connect, turn the unit on, and go to the GPS Manager in the KANINE
software.
Connection methods
•
USB Cord- The simplest and fastest method of connecting to the GPS Unit is to use the provided
USB cord. This type of connection provides the fastest means of data transfer from the unit and
also charges the unit’s battery as well.
•
Blue Tooth Connection- A connection to the GPS unit can also be made via Blueooth if the
user’s computer has Bluetooth capability. This kind of connection works well, but has a slower rate
of transferring data than does a USB connection.
Connecting to the device within the software
Many GPS related applications require the user to select the computer port that the GPS device is
connected to. This is not the case in KANINE. Any time that the KANINE software needs to connect to
the unit for an operation between the device and the computer, the KANINE software locates the unit
(finds the port where the unit is attached) and connects automatically to the unit. There are no manual
settings that need to be made by the user.
Available Functionality
The following functionality is available to registered GPS TrackPack users. Note that each of these
functions depend upon the GPS unit and software installation requirements discussed above.
•
Current Location- If the GPS Unit has a satellite connection and the user has an internet
connection, clicking the ‘Current Location’ button will display a map showing the current location of
the user.
•
Open Previously downloaded maps- The ‘Open Map’ button opens a file browser window that,
by default, shows any previously downloaded files that are currently stored in the default GPS
folder “...CBD Data\GPS_files”. Select any available file to view the previously downloaded map. If
the map is a ‘Google Earth’ type of map file (KML, KMZ), then the map will be opened directly in
Google Earth. Google Earth must be installed for this file type to open.
•
Download From GPS- This button currently allows the user to download map data collected on
the GPS TrackPack unit to 4 different types of Map files. These file type, and their attributes, are
listed below. Note that the user only needs to plug the unit in, turn the unit on to ‘Navigate’ and
click the desired download menu item to activate the download process. The KANINE software will
automatically connect to the device, download the map data from the GPS unit and then display
the downloaded map in the GPS Manager window.
o
Google Maps (HTML)- Does not require any additional mapping software to be installed.
Simply requires an Internet connection. Limited ability to alter the downloaded map.
o
Google Earth (KML)- Requires that Google Earth be installed on the computer. This format
provides the most options for adjusting and altering the downloaded map.
o
Google Earth (KMZ)- Requires Google Earth be installed on the computer. Is a zipped
version of the KML file. Smaller file, cannot alter the map like you can with a KML file.
o
GPX- GPX file types are used by some third party applications. There is no built in
functionality, other than the ability to download to this type, in the KANINE software. You
cannot currently view a GPX file in the KANINE software.
•
Clear GPS- The ‘Clear GPS’ button does just what it advertises. It clears all data from the GPS
Unit. Before clearing the GPS unit, you should be sure that you have downloaded any desired map
data from the unit. Once the unit is ‘Cleared’ the erased map data cannot be recovered.
o
Recommended data clearing tips- Although the GPS Unit can store multiple tracks at any
one time, it is recommended that the user clear the unit before each new track (after
downloading the map info), if possible. This keeps the unit uncluttered and makes
downloading easier as you do not have to sort through multiple tracks. If the user must store
multiple tracks on a unit, be sure to shut the unit off in between tracks and allow at least 2
minutes before each additional track. The software, when downloading maps from the unit,
consider each seperation of two minutes or greater to be a seperate track and in turn will not
attempt to tie the tracks together as one.
•
GPS Tools- The ‘GPS Tools’ button allows the user to perform secodary GPS functions, as
described below.
o
Save map as .jpg/.png- Selecting one of these menu items turns whatever you are viewing
in the GPS Manager screen into an image file, so that it can be attached to a desired
Deployment or Training record.
This function should be used after the
user has either opened or downloaded a
map into the GPS Manager screen.
Additionally, the user should adjust the
map for fit (side to size and zoom) prior
to the screen capture. This function will
capture the screen just as it is. When the
image is created, it will be displayed to
the user and will be saved to the default KANINE Pictures file ...\CBD Data\Pictures.
A new feature in KANINE Version 5.0 is the ability to directly attach a GPS map image to a
deployment or Training Record at the time of download. To perform this new process, do the
following:
▪
Perform the Track, using the GPS TrackPack to log the track
▪
Create the training or deployment record in KANINE
▪
Click the ‘Files’ button. This will open the Image and File Viewer.
▪
Click the radio button at the top right of the Viewer screen to go to the ‘GPS and
Mapping’ screen.
▪
Download the map from the GPS unit using your preferred download type.
▪
Adjust the map (zoom in, move left to right, etc. until the map is presented as you want
to save it).
▪
Click the ‘GPS Tools’ button
▪
Highlight the preferred ‘Save map as Menu item. (ie, Jpg or Png)
▪
Click ‘Attach to Current File’ menu item.
The map will then be attached to the record that you originally created prior to entering the
GPS screen.
o
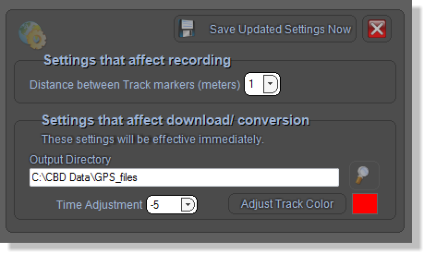
Set recommended Logger Settings- Some GPS settings, whether computer based
settings or GPS based
settings can be adjusted
from within the KANINE
GPS Manager screen.
To access the settings
click the ‘GPS Tools’
button and then select the
‘Set Recommended
Logger Settings’ menu
item. The adjustment
panel shown on the right
will be displayed.
In this panel, there are
four four applicable settings that can be adjusted by the user, as listed below.
▪
Distance between track markers (meters)- This adjustment affects the logger unit
during a track and tells the unit how often to mark the logger’s location during a track.
The more often the location is marked, the larger the resulting map file. However, this
should also result in a more accurate track. Imagine if you had the unit set to only
mark the location every 20 meters. There would be a lot of twists and turns that the
logger would have missed between marks. Therefore, the recommended settings is 1
meter for a K-9 Track.
▪
Output directory- To simplify the GPS processes, this setting is static and cannot be
adjusted by the user. The GPS Output path is adjusted dynamically to send GPS map
files to a folder named GPS_files that is created within the default data directory. So, if
your data is stored in the default location at C:\CBD Data then the GPS files will be
stored at C:\CBD Data\GPS_files.
▪
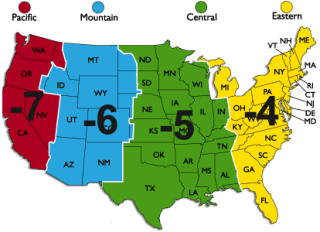
Time Adjustment-
Because the GPS unit
essentially gets a standard
UTC based time from the
satellite while the track is
being recorded, it is
necessary to provide a
setting to tell the
KANINE software how to
adjust the time displayed
on the maps so that they
are accurate for the user’s
time
zone. For instance, the Time
adjustment for the Central time
zone would be -5. A map showing the
necessary adjustment is shown to the right.
This
occurs at the time of data download, not at the time
of the track.
▪
Adjust Track Color- This setting allows the user to adjust the track color to a custom
setting. Then, when the track is downloaded from the unit, the process will mark the
track in the selected color.
o
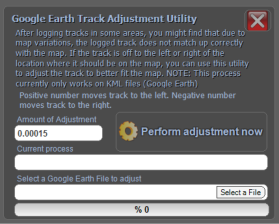
Adjust KML Track Left/Right- This is a special feature that most users will likely never
have to use. We have found that in some areas, mainly rural, the converted map does not
match up with the actual location of the GPS
coordinates recorded by the data logger. In
this case, the Adjustment Utility can be used
to adjust the track so that it matches the map
data and creates an accurate depiction of the
mapped track.
This adjustment can only be made to tracks
that have been downloaded to Google Earth
type files such as KML or KMZ.
If you have a track that is visibly shifted left
or right on the map, that needs adjustment,
you should do the following to get an
accurate map. Note that after the adjustment, Google Earth will automatically open and
present the adjusted map.
▪
Download the map to Google Earth (KML) format.
▪
Open the Adjustment utility from the GPS Manager screen
▪
Click the ‘Select a file’ button to select the KML map file that needs adjusted
▪
By default, the amount of adjustment is set at ‘0.00015’. Click the ‘Perform adjustment
now’ button to make the necessary adjustments. If the adjustments did not adequately
compensate for the maps error, perform the process again, using as adjusted ‘Amount
of adjust’
o
Search- This function is not related to the GPS TrackPack unit, but instead provides a
means for the user to perform a Google Maps search. Simply type an address or part of an
address a map of the search area will be displayed in the GPS Manager screen.
Full Screen Mode
The ‘View in Full Screen Mode’ button is self explanatory and hides all but the main map scren so that
the user has a full screen view of the map.
GPS Functionality and Requirements
KANINE Software includes a variety of built-in functions that interact with the KANINE GPS TrackPack
datalogger device. To utilize the full functionality of this screen, the computer must meet certain
requirements. Installation of the GPS device will be covered in a seperate section.
Computer Requirements
•
Gps TrackPack Device driver- A driver for the GPS device must be installed on the computer.
This driver is included in the CD that is sent with the GPS Unit.
•
Java Runtime- The Java runtime must be installed to any computer that needs to interact with the
GPS unit, such as downloading maps. Java can be downloaded here:
http://www.java.com/en/download/
•
Internet Connection- The GPS screen does not necessarily require an internet connection to
actually download a GPS map from the TrackPack Unit. However, to actually render or view the
map, an internet connection must be available.
Connecting to the GPS Unit
Once the windows drivers and Java runtime are installed on the user’s computer, connecting to the GPS
Unit couldn’t be simpler. Simply connect, turn the unit on, and go to the GPS Manager in the KANINE
software.
Connection methods
•
USB Cord- The simplest and fastest method of connecting to the GPS Unit is to use the provided
USB cord. This type of connection provides the fastest means of data transfer from the unit and
also charges the unit’s battery as well.
•
Blue Tooth Connection- A connection to the GPS unit can also be made via Blueooth if the
user’s computer has Bluetooth capability. This kind of connection works well, but has a slower rate
of transferring data than does a USB connection.
Connecting to the device within the software
Many GPS related applications require the user to select the computer port that the GPS device is
connected to. This is not the case in KANINE. Any time that the KANINE software needs to connect to
the unit for an operation between the device and the computer, the KANINE software locates the unit
(finds the port where the unit is attached) and connects automatically to the unit. There are no manual
settings that need to be made by the user.
Available Functionality
The following functionality is available to registered GPS TrackPack users. Note that each of these
functions depend upon the GPS unit and software installation requirements discussed above.
•
Current Location- If the GPS Unit has a satellite connection and the user has an internet
connection, clicking the ‘Current Location’ button will display a map showing the current location of
the user.
•
Open Previously downloaded maps- The ‘Open Map’ button opens a file browser window that,
by default, shows any previously downloaded files that are currently stored in the default GPS
folder “...CBD Data\GPS_files”. Select any available file to view the previously downloaded map. If
the map is a ‘Google Earth’ type of map file (KML, KMZ), then the map will be opened directly in
Google Earth. Google Earth must be installed for this file type to open.
•
Download From GPS- This button currently allows the user to download map data collected on
the GPS TrackPack unit to 4 different types of Map files. These file type, and their attributes, are
listed below. Note that the user only needs to plug the unit in, turn the unit on to ‘Navigate’ and
click the desired download menu item to activate the download process. The KANINE software will
automatically connect to the device, download the map data from the GPS unit and then display
the downloaded map in the GPS Manager window.
o
Google Maps (HTML)- Does not require any additional mapping software to be installed.
Simply requires an Internet connection. Limited ability to alter the downloaded map.
o
Google Earth (KML)- Requires that Google Earth be installed on the computer. This format
provides the most options for adjusting and altering the downloaded map.
o
Google Earth (KMZ)- Requires Google Earth be installed on the computer. Is a zipped
version of the KML file. Smaller file, cannot alter the map like you can with a KML file.
o
GPX- GPX file types are used by some third party applications. There is no built in
functionality, other than the ability to download to this type, in the KANINE software. You
cannot currently view a GPX file in the KANINE software.
•
Clear GPS- The ‘Clear GPS’ button does just what it advertises. It clears all data from the GPS
Unit. Before clearing the GPS unit, you should be sure that you have downloaded any desired map
data from the unit. Once the unit is ‘Cleared’ the erased map data cannot be recovered.
o
Recommended data clearing tips- Although the GPS Unit can store multiple tracks at any
one time, it is recommended that the user clear the unit before each new track (after
downloading the map info), if possible. This keeps the unit uncluttered and makes
downloading easier as you do not have to sort through multiple tracks. If the user must store
multiple tracks on a unit, be sure to shut the unit off in between tracks and allow at least 2
minutes before each additional track. The software, when downloading maps from the unit,
consider each seperation of two minutes or greater to be a seperate track and in turn will not
attempt to tie the tracks together as one.
•
GPS Tools- The ‘GPS Tools’ button allows the user to perform secodary GPS functions, as
described below.
o
Save map as .jpg/.png- Selecting one of these menu items turns whatever you are viewing
in the GPS Manager screen into an image file, so that it can be attached to a desired
Deployment or Training record.
This function should be used after the
user has either opened or downloaded a
map into the GPS Manager screen.
Additionally, the user should adjust the
map for fit (side to size and zoom) prior
to the screen capture. This function will
capture the screen just as it is. When the
image is created, it will be displayed to
the user and will be saved to the default KANINE Pictures file ...\CBD Data\Pictures.
A new feature in KANINE Version 5.0 is the ability to directly attach a GPS map image to a
deployment or Training Record at the time of download. To perform this new process, do the
following:
▪
Perform the Track, using the GPS TrackPack to log the track
▪
Create the training or deployment record in KANINE
▪
Click the ‘Files’ button. This will open the Image and File Viewer.
▪
Click the radio button at the top right of the Viewer screen to go to the ‘GPS and
Mapping’ screen.
▪
Download the map from the GPS unit using your preferred download type.
▪
Adjust the map (zoom in, move left to right, etc. until the map is presented as you want
to save it).
▪
Click the ‘GPS Tools’ button
▪
Highlight the preferred ‘Save map as Menu item. (ie, Jpg or Png)
▪
Click ‘Attach to Current File’ menu item.
The map will then be attached to the record that you originally created prior to entering the
GPS screen.
o
Set recommended Logger Settings- Some GPS settings, whether computer based
settings or GPS based
settings can be adjusted
from within the KANINE
GPS Manager screen.
To access the settings
click the ‘GPS Tools’
button and then select the
‘Set Recommended
Logger Settings’ menu
item. The adjustment
panel shown on the right
will be displayed.
In this panel, there are
four four applicable settings that can be adjusted by the user, as listed below.
▪
Distance between track markers (meters)- This adjustment affects the logger unit
during a track and tells the unit how often to mark the logger’s location during a track.
The more often the location is marked, the larger the resulting map file. However, this
should also result in a more accurate track. Imagine if you had the unit set to only
mark the location every 20 meters. There would be a lot of twists and turns that the
logger would have missed between marks. Therefore, the recommended settings is 1
meter for a K-9 Track.
▪
Output directory- To simplify the GPS processes, this setting is static and cannot be
adjusted by the user. The GPS Output path is adjusted dynamically to send GPS map
files to a folder named GPS_files that is created within the default data directory. So, if
your data is stored in the default location at C:\CBD Data then the GPS files will be
stored at C:\CBD Data\GPS_files.
▪
Time Adjustment-
Because the GPS unit
essentially gets a standard
UTC based time from the
satellite while the track is
being recorded, it is
necessary to provide a
setting to tell the
KANINE software how to
adjust the time displayed
on the maps so that they
are accurate for the user’s
time
zone. For instance, the Time
adjustment for the Central time
zone would be -5. A map showing the
necessary adjustment is shown to the right.
This
occurs at the time of data download, not at the time
of the track.
▪
Adjust Track Color- This setting allows the user to adjust the track color to a custom
setting. Then, when the track is downloaded from the unit, the process will mark the
track in the selected color.
o
Adjust KML Track Left/Right- This is a special feature that most users will likely never
have to use. We have found that in some areas, mainly rural, the converted map does not
match up with the actual location of the GPS
coordinates recorded by the data logger. In
this case, the Adjustment Utility can be used
to adjust the track so that it matches the map
data and creates an accurate depiction of the
mapped track.
This adjustment can only be made to tracks
that have been downloaded to Google Earth
type files such as KML or KMZ.
If you have a track that is visibly shifted left
or right on the map, that needs adjustment,
you should do the following to get an
accurate map. Note that after the adjustment, Google Earth will automatically open and
present the adjusted map.
▪
Download the map to Google Earth (KML) format.
▪
Open the Adjustment utility from the GPS Manager screen
▪
Click the ‘Select a file’ button to select the KML map file that needs adjusted
▪
By default, the amount of adjustment is set at ‘0.00015’. Click the ‘Perform adjustment
now’ button to make the necessary adjustments. If the adjustments did not adequately
compensate for the maps error, perform the process again, using as adjusted ‘Amount
of adjust’
o
Search- This function is not related to the GPS TrackPack unit, but instead provides a
means for the user to perform a Google Maps search. Simply type an address or part of an
address a map of the search area will be displayed in the GPS Manager screen.
Full Screen Mode
The ‘View in Full Screen Mode’ button is self explanatory and hides all but the main map scren so that
the user has a full screen view of the map.