About the Main Record Entry ScreenGeneral informationOne of the biggest changes to KANINE Version 5.0 from earlier versions is in how the main types of record viewing and entry are handled. In past version of KANINE, you would navigate to one screen that held only information specific to that single record type. To view a different record type, you would need move back to the main menu and then on to a completely different screen.In screen navigationIn KANINE Version 5, several main record types are accessible from the same screen. To switch from one record type to another, you simply click the appropriate radio button, as shown on the right. No need to return to the main menu.Shared Functionality (Standardization among all available record types)One great benefit to having all of the primary record types on one screen is the ability to share common functionality amongst all of the records. This shared functionality includes several different features from navigation, to creating reports and enables a more intuitive user experience. There are no surprises. If you can navigate and enter data in one of these records, you can do the same in all of the records on this screen. Standard features available on this screen are listed below:•Record Info. panel- This panel, if enabled,displays information about the current type of record that the user is focused on.•Field Help panel- This panel displays help information that is specific to the field that the mouse is currently occupying. this helps contains information about the type of data that should be entered into the field as well as some other useful information.•Search panel- The search panel enables the user to effectively locate previously entered records using various search parameters, some of which are record type specific. The user can choose from 5 different filter types, combining one with another as needed, and adjust the search data appropriately to return the records that the user is looking for. The search panel can literally locate one record in several different ways and takes the place of pre-set search functionality that limits the user to only those searches which have been pre-setup within the application.As an example, the screen shot of the search panel shown on the rightshows how one would display all records (of the record type that the user was currently focused on (ie. Training Records) for Officer Gregorybetween the dates of 7-5-2010 and 7-9-2010. Notice that the check boxes beside the Handler and Date fields are checked, indicating that the search will use the data beside the check boxes in its the search. To actually begin the record search after you have set the search parameters, simply click the Refresh Data button. When the search is completed, any records located will be displayed.•Image and File attachments- All of the record types in the Main Record Entry Screen can accept attachments via the Files button. Attachmentscan include various, record type specific, images or documents. For example, a medical record that documents a K-9’s yearly vaccination might have the actual vaccination documents attached to the record for later reference and printing if needed. A Deployment record might have images of a narcotics find as well as a copy of the defendant’s scanned written statement attached to it.•New button- The New button, located at the top left of the screen, creates a new record for current type of record that you are viewing. For instance, if you are currently viewing Training records and click the New button, a new Training record will be created. Note that records attached to the main part of the Deployment Record, such as People and Vehicles have their own New Button. Shortcut (Control) + (Shift)•Save button- The Save button saves any new or changed record information, in whichever record type is currently displayed. The Save action is also performed when the Main Record Entry Screen is closed, if needed. •Delete button- The Delete button deletes the selected record. This occurs no matter which type of record is currently active.•Undo Button- The undo button undoes any record changes that have taken place for the currently selected record type since the last save.•Reports button- The Reports button opens the Report window, allowing the user to select from reports that are specific to the type of record that the user is currently centered on.•Unlock button- Each time the user navigates to a new record or record type, the currently selected record is locked, so that accidental changes cannot be made to the record. The Unlock button unlocks the current record so that editing can take place. Shortcut (Control) + (Shift)


 About the Main Record Entry Screen
General information
One of the biggest changes to KANINE Version 5.0 from earlier versions is in how the main types of record
viewing and entry are handled. In past version of KANINE, you would navigate to one screen that held only
information specific to that single record type. To view a different record type, you would need move back to
the main menu and then on
to a completely different
screen.
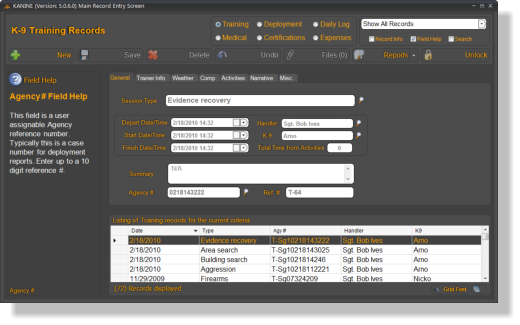
In screen navigation
In KANINE Version 5,
several main record types
are accessible from the
same screen. To switch
from one record type to
another, you simply click
the appropriate radio
button, as shown on the
right. No need to return to
the main menu.
Shared Functionality
(Standardization among all
available record types)
One great benefit to having all of the primary record types on one screen is the ability to share common
functionality amongst all of the records. This shared functionality includes several different features from
navigation, to creating reports and enables a more intuitive user experience. There are no surprises. If you
can navigate and enter data in one of these records, you can do the same in all of the records on this
screen. Standard features available on this screen are listed below:
•
Record Info. panel- This panel, if enabled,displays information about
the current type of record that the user is focused on.
•
Field Help panel- This panel displays help information that is specific
to the field that the mouse is currently occupying. this helps contains
information about the type of data that should be entered into the field
as well as some other useful information.
•
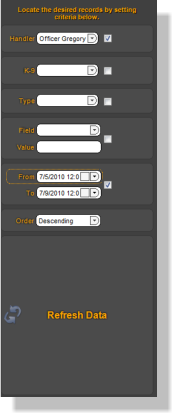
Search panel- The search panel enables the user to effectively locate
previously entered records using various search parameters, some of
which are record type specific. The user can choose from 5 different filter
types, combining one with another as needed, and adjust the search data
appropriately to return the records that the user is looking for. The search
panel can literally locate one record in several different ways and takes
the place of pre-set search functionality that limits the user to only those
searches which have been pre-setup within the application.
As an example, the screen shot of the search panel shown on the right
shows how one would display all records (of the record type that the user
was currently focused on (ie. Training Records) for Officer Gregory
between the dates of 7-5-2010 and 7-9-2010. Notice that the check
boxes beside the Handler and Date fields are checked, indicating that the
search will use the data beside the check boxes in its the search. To
actually begin the record search after you have set the search
parameters, simply click the Refresh Data button. When the search is
completed, any records located will be displayed.
•
Image and File attachments- All of the record types in the Main
Record Entry Screen can accept attachments via the Files button.
Attachments can include various, record type specific, images or
documents. For example, a medical record that documents a K-9’s yearly
vaccination might have the actual vaccination documents attached to the
record for later reference and printing if needed. A Deployment record might have images of a
narcotics find as well as a copy of the defendant’s scanned written statement attached to it.
•
New button- The New button, located at the top left of the screen, creates a new record for current
type of record that you are viewing. For instance, if you are currently viewing Training records and
click the New button, a new Training record will be created. Note that records attached to the main
part of the Deployment Record, such as People and Vehicles have their own New Button.
Shortcut (Control) + (Shift)
•
Save button- The Save button saves any new or changed record information, in whichever record
type is currently displayed. The Save action is also performed when the Main Record Entry Screen is
closed, if needed.
•
Delete button- The Delete button deletes the selected record. This occurs no matter which type of
record is currently active.
•
Undo Button- The undo button undoes any record changes that have taken place for the currently
selected record type since the last save.
•
Reports button- The Reports button opens the Report window, allowing the user to select from
reports that are specific to the type of record that the user is currently centered on.
•
Unlock button- Each time the user navigates to a new record or record type, the currently selected
record is locked, so that accidental changes cannot be made to the record. The Unlock button
unlocks the current record so that editing can take place. Shortcut (Control) + (Shift)
About the Main Record Entry Screen
General information
One of the biggest changes to KANINE Version 5.0 from earlier versions is in how the main types of record
viewing and entry are handled. In past version of KANINE, you would navigate to one screen that held only
information specific to that single record type. To view a different record type, you would need move back to
the main menu and then on
to a completely different
screen.
In screen navigation
In KANINE Version 5,
several main record types
are accessible from the
same screen. To switch
from one record type to
another, you simply click
the appropriate radio
button, as shown on the
right. No need to return to
the main menu.
Shared Functionality
(Standardization among all
available record types)
One great benefit to having all of the primary record types on one screen is the ability to share common
functionality amongst all of the records. This shared functionality includes several different features from
navigation, to creating reports and enables a more intuitive user experience. There are no surprises. If you
can navigate and enter data in one of these records, you can do the same in all of the records on this
screen. Standard features available on this screen are listed below:
•
Record Info. panel- This panel, if enabled,displays information about
the current type of record that the user is focused on.
•
Field Help panel- This panel displays help information that is specific
to the field that the mouse is currently occupying. this helps contains
information about the type of data that should be entered into the field
as well as some other useful information.
•
Search panel- The search panel enables the user to effectively locate
previously entered records using various search parameters, some of
which are record type specific. The user can choose from 5 different filter
types, combining one with another as needed, and adjust the search data
appropriately to return the records that the user is looking for. The search
panel can literally locate one record in several different ways and takes
the place of pre-set search functionality that limits the user to only those
searches which have been pre-setup within the application.
As an example, the screen shot of the search panel shown on the right
shows how one would display all records (of the record type that the user
was currently focused on (ie. Training Records) for Officer Gregory
between the dates of 7-5-2010 and 7-9-2010. Notice that the check
boxes beside the Handler and Date fields are checked, indicating that the
search will use the data beside the check boxes in its the search. To
actually begin the record search after you have set the search
parameters, simply click the Refresh Data button. When the search is
completed, any records located will be displayed.
•
Image and File attachments- All of the record types in the Main
Record Entry Screen can accept attachments via the Files button.
Attachments can include various, record type specific, images or
documents. For example, a medical record that documents a K-9’s yearly
vaccination might have the actual vaccination documents attached to the
record for later reference and printing if needed. A Deployment record might have images of a
narcotics find as well as a copy of the defendant’s scanned written statement attached to it.
•
New button- The New button, located at the top left of the screen, creates a new record for current
type of record that you are viewing. For instance, if you are currently viewing Training records and
click the New button, a new Training record will be created. Note that records attached to the main
part of the Deployment Record, such as People and Vehicles have their own New Button.
Shortcut (Control) + (Shift)
•
Save button- The Save button saves any new or changed record information, in whichever record
type is currently displayed. The Save action is also performed when the Main Record Entry Screen is
closed, if needed.
•
Delete button- The Delete button deletes the selected record. This occurs no matter which type of
record is currently active.
•
Undo Button- The undo button undoes any record changes that have taken place for the currently
selected record type since the last save.
•
Reports button- The Reports button opens the Report window, allowing the user to select from
reports that are specific to the type of record that the user is currently centered on.
•
Unlock button- Each time the user navigates to a new record or record type, the currently selected
record is locked, so that accidental changes cannot be made to the record. The Unlock button
unlocks the current record so that editing can take place. Shortcut (Control) + (Shift)