About the Master Names ScreenThe Master Names Repository screen serves as a collection of names that have been entered into the KANINE system. Once a name has been entered, it does not have to be re-entered and can simply be selected from the Master Names Screen and inserted into the record.The Master Names Screen has some special features, such as partial name lookup and automatic city and state data insertion when a valid zip code is entered. The Master Names screen has many standard KANINE features, such as record locks, file attachment ability and other globally standard text field related features.IntroductionThe Master Names screen can be access in one of two ways. The first is from the main KANINE 5.0 screen by clicking View/ Master Names. The second method of accessing Master Names is during the creation of a record that utilizes stored names, such as when entering ‘People connected to’ Deployment reports on the ‘People/Vehicles’ tab. Or, when selecting the Owner or operator in the Deployment Vehicles tab. To understand the Master Names screen, you must understand that KANINE typically does not allow the direct editing of the person’s name in the Deployment record, or other record that utilizes the name. Instead, you must add new names and make any edits to existing names with the Master Name Screen itself. Then, any names added to the Master Names screen can be instered into the calling record as needed. Adding new namesNames added into the Master Names screen only need to be entered once and can then be accessed and used again and again, as needed in future records. To add a new name to the list of accessible names, click the ‘New’ button. Clicking the new button performs any necessary unlocking actions and creates a new record for name data entry.On clicking the ‘New’ button, the cursor will be instered into the ‘Last name’ field. Enter the last name and then move to each subsequent field by hitting the ‘Tab’ button on your keyboard. After entering the information on each tab, you can hit ‘Control-Right arrow’ to proceed to the next tab (Descriptors), without having to use the mouse. This applies for the remaining tabs as well.Complete the information, as best as possible, on the ‘Descriptors’ tab and then move on to the ‘Address Info’ tab. On entering this tab, you must click the button that reads ‘Click here to Edit Address’ button to unlock the address tab fields. Alternatively, you can simply click the ‘Enter’ key on your keyboard when centered on this tab, to unlock the address fields for editing. Your cursor will move to the ‘Address 1’ field at this time. Auto City LookupTo reduce the number of key stroked required by the user, KANINE 5.0 includes an auto city lookup on the ‘Address Info’ tab. This is an automated feature that automatically looks up and inserts the ‘City’ and ‘State’ information when any valid 5 digit zip code is entered.Assisted City LookupIf you do not know the zip code of the person’s address, KANINE will still attempt to assist you. In this case, simply place your cursor in the ‘State’ field and select the state where the person lives. After selection, your cursor will move to the ‘City’ field and the selection list will open again (if the city field is empty). The selection list will then display two lists. The list on the left displays all of the citys for the state that you selected. The list on the right shows city names that have previously been entered for other names. Select the city from one of these lists, or type the city name in the free-text field at the bottom of the selection list screen.Looking Up Existing NamesOnce a name has been previously entered into the Master Names Repository, it will be available for selection or editing at a later time. You can approach name lookups in two different ways.•Scroll through the name list- Clicking the ‘Show All’ button will fill the name selection list on the left side of the screen with all names that have previously been entered, allowing you to search manually through the list of names and select the desired name.•Locate names by typing a portion of the name- When the Master Names form first opens, the mouse cursor is placed directly into the search field at the top left portion of the screen. Without using the mouse, you can type a portion of the name that you want to locate in the search field and hit the (Enter) key to begin the search. By keeping in mind how the names are search, you can also search by last name, first name or middle name. Names are searched by this format (Last,First Middle).oSearch for any part of a name- To search for a part of a name, simply type the partial text into the search box and hit the enter key. For instance if you type ‘Rog’ you might get back ‘Rogers,Michael William’ or Blakely,Roger Wayne’ because the text ‘Rog’ is contained somewhere in both of those names.oSearch for a last name- To search for any name with the last name of ‘Rogers’ you can use the comma in the name to your advantage and type ‘Rogers,’ into the search field. Typing the comma at the end ensures that you will only locate names with the ‘Last’ name of Rogers.oSearch for a first name- To search for a first name you can use the comma to your advantage as well. But, for a first name search, you place the comma directly at the front of the search text. For instance, if you typed ‘,Donald’, the system would return all names with a first name of Donald.oSearch for a middle name- Because named are stored with a space between the first name and middle name (Like: Franks,Donald Gregory), middle names can be located by prefacing your search text with a space (Like: ‘ Donald’)Inserting the nameOnce you have located, or added, the name that you want to use in your record, click the ‘Insert Name’ button at the top right portion of the Master Names form to insert the name and address information into the record that you are working on.Additional featuresThe Master Names screen does include additional functionality as well, including the ability to attach photos, Word and Pdf files directly to the name record. And the Ability to Print information from the person record. Available Shortcuts•Unlock record for editing- (Control) + (Spacebar)•Create New record-(Control) + (F1)•Navigate through tab panels- Next (Control) + (Arrow Right) Previous(Control) + (Arrow Left)•Navigate through Name List-Move through the name list on the left side of the screen. Next-(Control) + (Arrow Down) Previous-(Control) + (Arrow Up)•Insert selected name into the calling record-Clicks the 'Insert Names' button. (Control) + (Enter Key)


 About the Master Names Screen
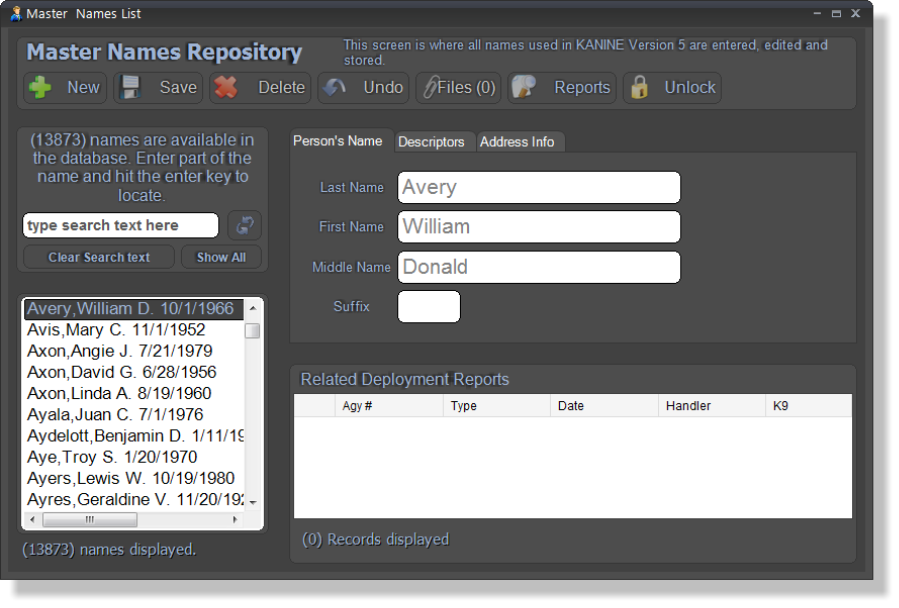
The Master Names Repository screen
serves as a collection of names that have
been entered into the KANINE system.
Once a name has been entered, it does not
have to be re-entered and can simply be
selected from the Master Names Screen
and inserted into the record.
The Master Names Screen has some
special features, such as partial name
lookup and automatic city and state data
insertion when a valid zip code is entered.
The Master Names screen has many
standard KANINE features, such as record
locks, file attachment ability and other
globally standard text field related features.
About the Master Names Screen
The Master Names Repository screen
serves as a collection of names that have
been entered into the KANINE system.
Once a name has been entered, it does not
have to be re-entered and can simply be
selected from the Master Names Screen
and inserted into the record.
The Master Names Screen has some
special features, such as partial name
lookup and automatic city and state data
insertion when a valid zip code is entered.
The Master Names screen has many
standard KANINE features, such as record
locks, file attachment ability and other
globally standard text field related features.
 Introduction
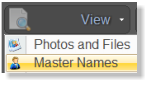
The Master Names screen can be access in one of two ways. The first is from the
main KANINE 5.0 screen by clicking View/ Master Names. The second method of
accessing Master Names is during the creation of a record that utilizes stored
names, such as when entering ‘People connected to’ Deployment reports on the
‘People/Vehicles’ tab. Or, when selecting the Owner or operator in the Deployment
Vehicles tab.
To understand the Master Names screen, you must understand that KANINE typically does not allow the
direct editing of the person’s name in the Deployment record, or other record that utilizes the name.
Instead, you must add new names and make any edits to existing names with the Master Name Screen
itself. Then, any names added to the Master Names screen can be instered into the calling record as
needed.
Adding new names
Names added into the Master Names screen only need to be entered once and can then be accessed
and used again and again, as needed in future records. To add a new name to the list of accessible
names, click the ‘New’ button. Clicking the new button performs any necessary unlocking actions and
creates a new record for name data entry.
On clicking the ‘New’ button, the cursor will be instered into the ‘Last name’ field. Enter the last name and
then move to each subsequent field by hitting the ‘Tab’ button on your keyboard. After entering the
information on each tab, you can hit ‘Control-Right arrow’ to proceed to the next tab (Descriptors), without
having to use the mouse. This applies for the remaining tabs as well.
Complete the information, as best as possible, on the ‘Descriptors’ tab and then move on to the ‘Address
Info’ tab. On entering this tab, you must click the button that reads ‘Click here to Edit Address’ button to
unlock the address tab fields. Alternatively, you can simply click the ‘Enter’ key on your keyboard when
centered on this tab, to unlock the address fields for editing. Your cursor will move to the ‘Address 1’ field
at this time.
Auto City Lookup
To reduce the number of key stroked required by the user, KANINE 5.0 includes an auto city lookup on
the ‘Address Info’ tab. This is an automated feature that automatically looks up and inserts the ‘City’ and
‘State’ information when any valid 5 digit zip code is entered.
Assisted City Lookup
If you do not know the zip code of the person’s address, KANINE will still attempt to assist you. In this
case, simply place your cursor in the ‘State’ field and select the state where the person lives. After
selection, your cursor will move to the ‘City’ field and the selection list will open again (if the city field is
empty). The selection list will then display two lists. The list on the left displays all of the citys for the state
that you selected. The list on the right shows city names that have previously been entered for other
names. Select the city from one of these lists, or type the city name in the free-text field at the bottom of
the selection list screen.
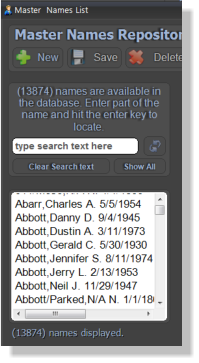
Looking Up Existing Names
Once a name has been previously entered into the Master Names Repository, it will be available for
selection or editing at a later time. You can approach name lookups in two different ways.
•
Scroll through the name list- Clicking the ‘Show All’ button will fill the name
selection list on the left side of the screen with all names that have previously
been entered, allowing you to search manually through the list of names and
select the desired name.
•
Locate names by typing a portion of the name- When the Master Names
form first opens, the mouse cursor is placed directly into the search field at the
top left portion of the screen. Without using the mouse, you can type a portion
of the name that you want to locate in the search field and hit the (Enter) key to
begin the search. By keeping in mind how the names are search, you can also
search by last name, first name or middle name. Names are searched by this
format (Last,First Middle).
o
Search for any part of a name- To search for a part of a name, simply
type the partial text into the search box and hit the enter key. For
instance if you type ‘Rog’ you might get back ‘Rogers,Michael William’
or Blakely,Roger Wayne’ because the text ‘Rog’ is contained
somewhere in both of those names.
o
Search for a last name- To search for any name with the last name of
‘Rogers’ you can use the comma in the name to your advantage and
type ‘Rogers,’ into the search field. Typing the comma at the end
ensures that you will only locate names with the ‘Last’ name of Rogers.
o
Search for a first name- To search for a first name you can use the
comma to your advantage as well. But, for a first name search, you
place the comma directly at the front of the search text. For instance, if
you typed ‘,Donald’, the system would return all names with a first name of Donald.
o
Search for a middle name- Because named are stored with a space between the first name and middle
name (Like: Franks,Donald Gregory), middle names can be located by prefacing your search text with a
space (Like: ‘ Donald’)
Inserting the name
Once you have located, or added, the name that you want to use in your record, click the ‘Insert Name’
button at the top right portion of the Master Names form to insert the name and address information into
the record that you are working on.
Additional features
The Master Names screen does include additional functionality as well, including the ability to attach
photos, Word and Pdf files directly to the name record. And the Ability to Print information from the
person record.
Introduction
The Master Names screen can be access in one of two ways. The first is from the
main KANINE 5.0 screen by clicking View/ Master Names. The second method of
accessing Master Names is during the creation of a record that utilizes stored
names, such as when entering ‘People connected to’ Deployment reports on the
‘People/Vehicles’ tab. Or, when selecting the Owner or operator in the Deployment
Vehicles tab.
To understand the Master Names screen, you must understand that KANINE typically does not allow the
direct editing of the person’s name in the Deployment record, or other record that utilizes the name.
Instead, you must add new names and make any edits to existing names with the Master Name Screen
itself. Then, any names added to the Master Names screen can be instered into the calling record as
needed.
Adding new names
Names added into the Master Names screen only need to be entered once and can then be accessed
and used again and again, as needed in future records. To add a new name to the list of accessible
names, click the ‘New’ button. Clicking the new button performs any necessary unlocking actions and
creates a new record for name data entry.
On clicking the ‘New’ button, the cursor will be instered into the ‘Last name’ field. Enter the last name and
then move to each subsequent field by hitting the ‘Tab’ button on your keyboard. After entering the
information on each tab, you can hit ‘Control-Right arrow’ to proceed to the next tab (Descriptors), without
having to use the mouse. This applies for the remaining tabs as well.
Complete the information, as best as possible, on the ‘Descriptors’ tab and then move on to the ‘Address
Info’ tab. On entering this tab, you must click the button that reads ‘Click here to Edit Address’ button to
unlock the address tab fields. Alternatively, you can simply click the ‘Enter’ key on your keyboard when
centered on this tab, to unlock the address fields for editing. Your cursor will move to the ‘Address 1’ field
at this time.
Auto City Lookup
To reduce the number of key stroked required by the user, KANINE 5.0 includes an auto city lookup on
the ‘Address Info’ tab. This is an automated feature that automatically looks up and inserts the ‘City’ and
‘State’ information when any valid 5 digit zip code is entered.
Assisted City Lookup
If you do not know the zip code of the person’s address, KANINE will still attempt to assist you. In this
case, simply place your cursor in the ‘State’ field and select the state where the person lives. After
selection, your cursor will move to the ‘City’ field and the selection list will open again (if the city field is
empty). The selection list will then display two lists. The list on the left displays all of the citys for the state
that you selected. The list on the right shows city names that have previously been entered for other
names. Select the city from one of these lists, or type the city name in the free-text field at the bottom of
the selection list screen.
Looking Up Existing Names
Once a name has been previously entered into the Master Names Repository, it will be available for
selection or editing at a later time. You can approach name lookups in two different ways.
•
Scroll through the name list- Clicking the ‘Show All’ button will fill the name
selection list on the left side of the screen with all names that have previously
been entered, allowing you to search manually through the list of names and
select the desired name.
•
Locate names by typing a portion of the name- When the Master Names
form first opens, the mouse cursor is placed directly into the search field at the
top left portion of the screen. Without using the mouse, you can type a portion
of the name that you want to locate in the search field and hit the (Enter) key to
begin the search. By keeping in mind how the names are search, you can also
search by last name, first name or middle name. Names are searched by this
format (Last,First Middle).
o
Search for any part of a name- To search for a part of a name, simply
type the partial text into the search box and hit the enter key. For
instance if you type ‘Rog’ you might get back ‘Rogers,Michael William’
or Blakely,Roger Wayne’ because the text ‘Rog’ is contained
somewhere in both of those names.
o
Search for a last name- To search for any name with the last name of
‘Rogers’ you can use the comma in the name to your advantage and
type ‘Rogers,’ into the search field. Typing the comma at the end
ensures that you will only locate names with the ‘Last’ name of Rogers.
o
Search for a first name- To search for a first name you can use the
comma to your advantage as well. But, for a first name search, you
place the comma directly at the front of the search text. For instance, if
you typed ‘,Donald’, the system would return all names with a first name of Donald.
o
Search for a middle name- Because named are stored with a space between the first name and middle
name (Like: Franks,Donald Gregory), middle names can be located by prefacing your search text with a
space (Like: ‘ Donald’)
Inserting the name
Once you have located, or added, the name that you want to use in your record, click the ‘Insert Name’
button at the top right portion of the Master Names form to insert the name and address information into
the record that you are working on.
Additional features
The Master Names screen does include additional functionality as well, including the ability to attach
photos, Word and Pdf files directly to the name record. And the Ability to Print information from the
person record.
 Available Shortcuts
•
Unlock record for editing- (Control) + (Spacebar)
•
Create New record- (Control) + (F1)
•
Navigate through tab panels- Next (Control) + (Arrow Right) Previous(Control) +
(Arrow Left)
•
Navigate through Name List- Move through the name list on the left side of the
screen. Next-(Control) + (Arrow Down) Previous-(Control) + (Arrow Up)
•
Insert selected name into the calling record- Clicks the 'Insert Names' button.
(Control) + (Enter Key)
Available Shortcuts
•
Unlock record for editing- (Control) + (Spacebar)
•
Create New record- (Control) + (F1)
•
Navigate through tab panels- Next (Control) + (Arrow Right) Previous(Control) +
(Arrow Left)
•
Navigate through Name List- Move through the name list on the left side of the
screen. Next-(Control) + (Arrow Down) Previous-(Control) + (Arrow Up)
•
Insert selected name into the calling record- Clicks the 'Insert Names' button.
(Control) + (Enter Key)